
Here are step by step instructions for initial OLT configuration and for setting up the IP connectivity of the Fiberhome AN5506/AN5506B/AN5516 OLTs. After completing these steps, you'll be ready to connect your OLT to SmartOLT.
Connecting to the Fiberhome serial port
By default, Fiberhome OLTs don't have an IP address. This can be configured in 2 modes, on the Management Card (debug ip) or on a VLAN (manage vlan). Connect to the OLT using a serial cable, with software like PuTTY or HyperTerminal:
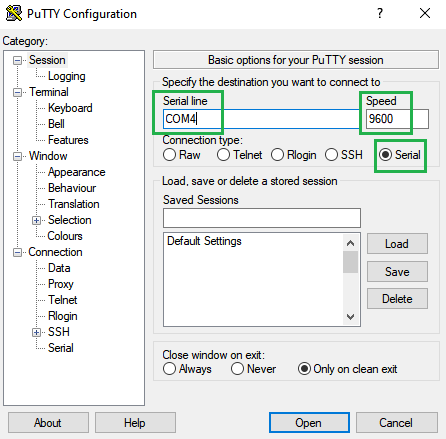
Use the credentials supplied by your vendor to login to the OLT (defaults are User: GEPON, Pass: GEPON).
Type enable and enter the admin pass (GEPON).
                               Master

############################################################
#                                                          #
#                   Welcome to FOS.                        #
#                                                          #
#      Press Return to connect and config this system.     #
#                                                          #
############################################################


Login: GEPON
Password: *****

User> enable
Password: *****
Admin#
Setting IP on Management Card (recommended)
Now you are logged in, set the IP address you have reserved for the OLT, and the default gateway:
set debugip [your_olt_ip_address] mask [your_netmask]
cd service
add static route destination 0.0.0.0 gateway [your_IP_gateway] mask 0.0.0.0
cd ..
Admin# set debugip [your_ip_address] mask [your_netmask]

Admin# show debugip
Ethernet IP address      : 192.168.1.10 (example IP)
Ethernet subnet mask     : 255.255.255.0 (example mask)
MAC Address              : 48-f9-7c-b4-e3-12 (your management card MAC)

Admin# cd service
Admin\service# add static route destination 0.0.0.0 gateway [your_IP_gateway] mask 0.0.0.0
Admin\service# cd ..
Admin#
Some Fiberhome firmwares do not accept the default route (0.0.0.0) as a valid configuration.
If you gen an error like ERROR ulDestIp = 00 ulGateWay = c0a80102 ulIpMask = 00 followed by Command executes failed.
you have to add specific static routes to SmartOLT servers and your local networks, or upgrade firmware.
If the above command was ok, please skip this step:
Admin# cd service
Admin\service# add static route destination 85.204.249.2 gateway [your_IP_gateway] mask 255.255.255.255
Admin\service# add static route destination 85.204.249.2 gateway [your_IP_gateway] mask 255.255.255.255
Admin\service# add static route destination 85.204.249.2 gateway [your_IP_gateway] mask 255.255.255.255
Connect an ethernet cable to the dedicated (out-of-band) management port of the OLT. Depending on your chassis, this management port is typically labeled ETH if it is on the Master/Slave Card, or EMS, if it is found on the chassis (AN5516-01). It is positioned UNDER the CONSOLE/ESC.
The ETH port is an isolated port, designed for management purposes only. This port cannot be used to transport customers traffic.
Setting IP on Management VLAN (not recommended)
info despre manage vlan
Adding / verifying the cards in OLT
By default there is no authorized card in OLT. The OLT autodetects the cards, but they must be authorized with the correct type. This is an example, where all cards with NO_MATCH state must be authorized. Type the command showcard:
Admin# showcard
--------------------AN5516-04B-----------------------
CARD   EXIST   CONFIG   DETECT    DETAIL
  1     YES      ---     GCOB    NO_MATCH
  2     YES      ---     EC8B    NO_MATCH
  9     YES     HSUC     HSUC     MATCH/M
 10     YES     HSUC     HSUC     MATCH/S
 21     YES      ---      FAN    NO_MATCH
 24     YES      ---    POWER    NO_MATCH
 25     ---      ---      ---         ---
------------------------------------------
Current temperature is 52 C.
 Power 1 and Power 2 are ON.
 FAN speed is 5.
For this example, we will authorize the cards by ther type. You must do the same on your OLT, but with the correct cards that you have:
Admin# set card_auth slot 21 type fan
set 21 slot as type fan.

Admin# set card_auth slot 24 type pwr
set 24 slot as type pwr.

Admin# set card_auth slot 1 type gcob
 hotplug_et_pon_discov_trycount_byslot[2005] type=550
set 1 slot as type gcob.

Admin# set card_auth slot 2 type ec8b
 hotplug_et_pon_discov_trycount_byslot, slot 2 pon-num 8
set 2 slot as type ec8b.

# Now verify that all the cards are in the correct state of MATCH

Admin# showcard
--------------------AN5516-04B-----------------------
CARD   EXIST   CONFIG   DETECT    DETAIL
  1     YES     GCOB     GCOB       MATCH
  2     YES     EC8B     EC8B       MATCH
  9     YES     HSUC     HSUC     MATCH/M (Master)
 10     YES     HSUC     HSUC     MATCH/S (Slave)
 21     YES      FAN      FAN       MATCH
 24     YES    POWER    POWER       MATCH
 25     ---      ---      ---         ---
------------------------------------------
Current temperature is 52 C.
 Power 1 and Power 2 are ON.
 FAN speed is 5.
Create an admin user for SmartOLT
Create a dedicated username/password. SmartOLT system will use this user/pass to manage your OLT:
cd serviceuser add smartoltusr login-password (enter a strong password)
user role smartoltusr admin enable-password (enter a strong password)
Admin# cd service

Admin\service# user add smartoltusr login-password (enter a strong password)
Successfully added user smartoltusr as a NORMAL_USER ,
To change user role use "user role" command .

Admin\service# user role smartoltusr admin enable-password (enter a strong password)
Successfully change user smartoltusr to ADMIN mode.
Other settings
auto-write enableauto-write 18:00:00 everyday
mib-compatibility iftable v2
ntp server 91.189.89.199 priority 1
ntp server 80.96.196.58 priority 2
ntp enable